Prelude
🎤 For some time now I’ve been trying to set up my old Behringer C2 condenser microphone for streaming, gaming, Discord calls, etc on Ubuntu. I explained why in my earlier post:
I wanted to use this microphone for one simple reason: I strongly prefer watching streamers with a clear voice.
That post covered an earlier TASCAM audio interface saga. Since then, I have switched to a Behringer UMC202HD, and have started out with audio filtering to improve the quality of voice capture. Here’s a before and after:
-
Voice-capture recorded out-of-the-box:
-
Split multichannel input and recorded the microphone only:
-
Add filters to voice capture:
The out-of-the-box recording sucks because my voice is only in the right channel. We’re going to solve this first problem in this post, by splitting the multi-channel input via PipeWire.
In a later post, I’ll cover how I configured LV2 plugins using Carla to filter out noise (although it is a little too muffled).
Current audio hardware
Before we go any further, here’s a summary of my (currently dusty) hardware setup:
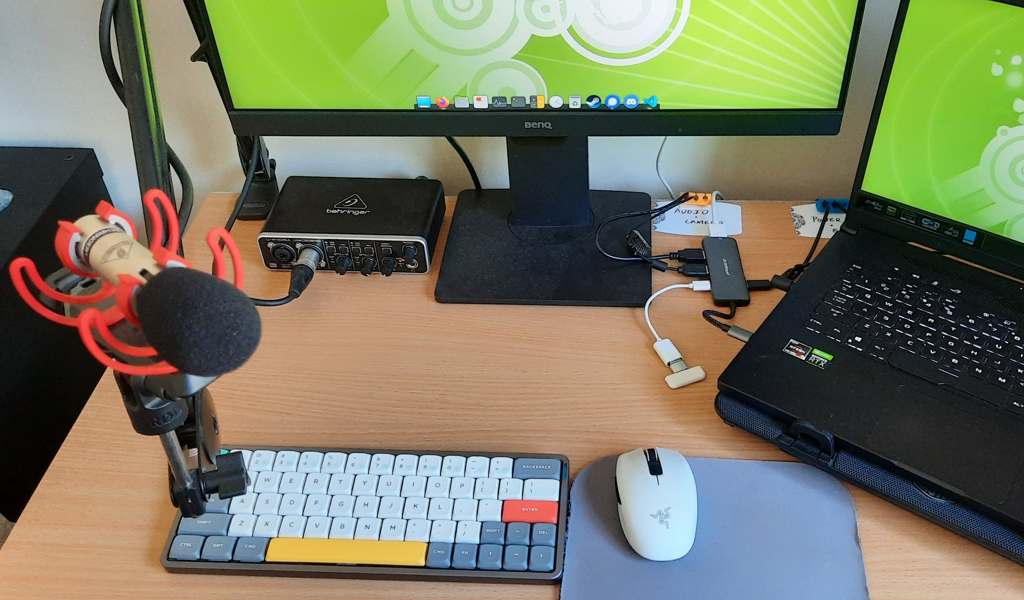
- Behringer C2 cardioid condenser microphone.
- Behringer UMC202HD audio interface.
- mbeat Elite 7-in-1 USB hub.
- RODE SM3-R microphone shock mount.
- Stadium MicArm clamp mount microphone arm.
- 1.5m XLR cable (unknown, possibly Connex).
These are all relatively affordable compared to, say, a high-spec desktop computer. Except for that pesky shock mount.
You may notice that the microphone is plugged in to Input 2. It’s not
designated as ’left’ or ‘right’, but that is how it is treated out-of-the-box.
We’ll try two approaches to splitting the multi-channel input into separate ‘mono’ inputs, first using ALSA’s Use Case Manager, then using PipeWire’s loopback module which will have less latency.
Splitting via ALSA Use Case Manager
This device has a ‘use case’ configuration that will split the channels up
for us. I had to patch /usr/share/alsa/ucm2/common/pcm/split.conf (see
alsa-ucm-conf/issues/348), and this is the difference in
the relevant (input) nodes in qpwgraph between no-UCM and UCM:
-
No UCM
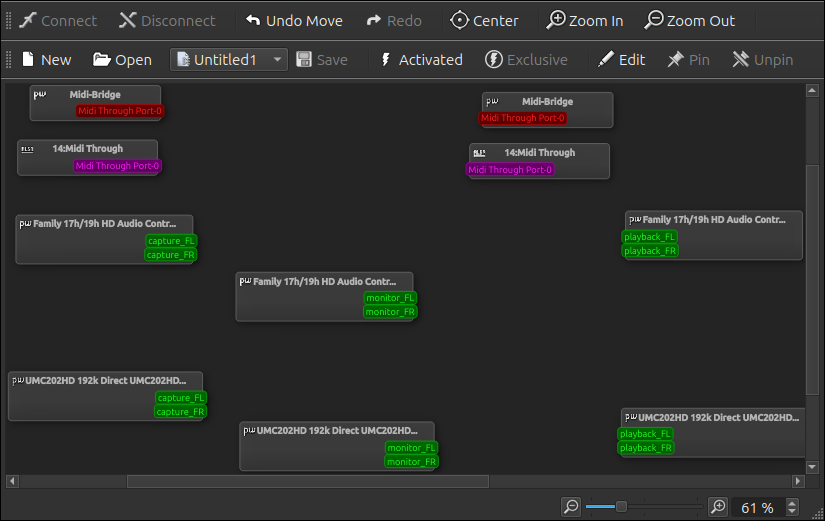
-
With UCM (HiFi profile)
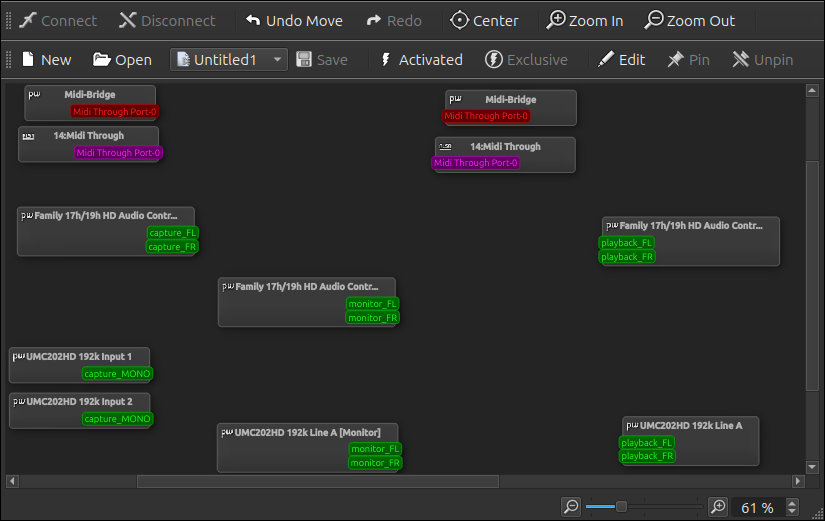
With UCM we have UMC202HD 192k Input 1 and Input 2 with one (mono) port each
in the bottom left, and the bottom right has a stereo output Line A.
One problem. UCM adds about 10ms of latency to the audio when splitting. For many users this isn’t a problem, but I want audio and video to be as synchronised as possible. The expert advice was:
Wim Taymans @wtaymans: I would suggest to not use UCM and use native PipeWire filters and virtual devices to split the card into separate sinks and channels.
Better splitting using PipeWire loopback
🛑 These instructions are very specific to PipeWire 1.0.5 and WirePlumber 0.4.17, the current versions for the distribution I use: Ubuntu MATE 24.04.1.
To split via PipeWire (not ALSA’s UCM) we need to do two things:
- Stop PipeWire from using the UCM for this device.
- Create two loopback nodes; one each for the ’left’ and ‘right’ channels.
Disabling UCM via WirePlumber
To disable UCM we’ll set WirePlumber’s api.alsa.use-ucm property on the
device to false.
The configuration files for WirePlumber 0.4.17 are Lua
scripts. WirePlumber’s alsa_monitor module is
responsible for picking up and organising the UMC202HD when it is plugged in.
We need to modify the module’s rules, and I arrived at the following simple
script:
table.insert (alsa_monitor.rules, {
    matches = {
        {
        -- NOTE: The match string is _not_ a regular expression; '*' will match
        -- to any (even empty) string; '?' matches to any single character.
            { "device.name", "matches", "alsa_card.usb-BEHRINGER_UMC202HD*" },
        },
    },
    apply_properties = { ["api.alsa.use-ucm"] = false }
})
⚠️ Just as important as the contents of the script, is where it goes and when it should be executed.
Regarding where: I like to use my home folder as I want the changes to apply to my sessions only; handily WirePlumber 0.4.17 will look in the following home locations:
~/.config/wireplumber/main.lua.d/*.luafor loading, configuring, or even starting modules to monitor ALSA, V4L2, libcamera;~/.config/wireplumber/policy.lua.d/*.luato configure policies for clients connected to particular endpoints (see Policy Configuration), or;~/.config/wireplumber/bluetooth.lua.d/*.luafor loading, configuring, or even starting bluetooth-related monitors, e.g. the bluez monitor (see Bluetooth Configuration).
To figure out when the configuration is executed, we need to look more
broadly at the system-wide configuration files found in:
/usr/share/wireplumber/main.lua.d/*.lua:
user@home:~$ ls /usr/share/wireplumber/main.lua.d
00-functions.lua          30-v4l2-monitor.lua     50-default-access-config.lua
20-default-access.lua     40-device-defaults.lua  50-libcamera-config.lua
30-alsa-monitor.lua       40-stream-defaults.lua  50-v4l2-config.lua
30-libcamera-monitor.lua  50-alsa-config.lua      90-enable-all.lua
- WirePlumber collects both the user-specific and system-wide
main.lua.d/*.luafiles and executes them in file-name order (then does the same forpolicy.lua.dand so on). alsa_monitor.ruleswill be constructed in50-alsa-config.lua.alsa_monitorand the other main modules are started in90-enable-all.lua.
In short, we want our script to run after alsa_monitor.rules is constructed
but before the monitor is started, so we should name it something like
51-behringer-no-ucm.lua and place it within
~/.config/wireplumber/main.lua.d.
With a quick systemctl restart --user wireplumber.service the output of
qpwgraph will then be equivalent to the ‘No UCM’ case above.
Virtual loopback via PipeWire
PipeWire’s loopback module sets up a capture and playback node-pair. In our use-case, the capture node will ’target’ the UMC202HD input. While the impact of targetting is handled by the session manager (WirePlumber) the property of having a target can be set in PipeWire.
We need a node.name for the the target.object
node-property need a node.name. We can do this in two
steps:
-
Find the
idfor the UMC202HD input usingwpctl:user@home:~$ wpctl status | grep UMC202HD │ 40. UMC202HD 192k [alsa] │ 52. UMC202HD 192k Analog Stereo [vol: 1.00]The first item above (
id=40) is the device, and the second (id=52) is the source node for the UMC202HD (to confirm this, check the full output ofwpctl status). -
Find the
node.nameviawpctl inspect:user@home:~$ wpctl inspect 52 | grep node.name * node.name = "alsa_input.usb-BEHRINGER_UMC202HD_192k_12345678-00.analog-stereo"
Armed with this and the documentation for the loopback module, we land at the following configuration in SPA-JSON format:
# Construct two mono loopback (source) nodes from the UMC202HD
context.modules = [
    { name = libpipewire-module-loopback
        args = {
            node.description = "UMC202HD 192k Input 1"
            capture.props = {
                audio.position = [ FL ]
                media.name = ""
                stream.dont-remix = true
                target.object = "alsa_input.usb-BEHRINGER_UMC202HD_192k_12345678-00.analog-stereo"
                node.passive = true
            }
            playback.props = {
                node.name = "loopback.BEHRINGER_UMC202HD_192k_12345678-00.Input.1"
                media.name = ""
                media.class = "Audio/Source"
                audio.position = [ MONO ]
                audio.channels = 1
            }
        }
    }
##########################################################
####    Same again but FL->FR and Input.1->Input.2    ####
##########################################################
]
This configuration goes in ~/.config/pipewire/pipewire.conf.d/. PipeWire
reads the configuration files in location-then-name order, and when each file
is loaded:
Dictionary sections are merged, overriding properties if they already existed, and array sections are appended to.
The configuration in the home folder is loaded last; so our configuration is (happily) executed after everything else is set up for us.
It seems like we’ve come a long way, but: this isn’t even my final form 😈!

CC BY-NC 3.0, elfaceitoso.
Even better splitting with WirePlumber session manager
👁️ To my eyes, there’s a drawback with the ‘pure-PipeWire’ loopback
approach: the Input 1 and Input 2 nodes are always in the graph even when
the device is not connected. I was able to solve this by developing a
WirePlumber script - similar the packaged
‘components’ that come with WirePlumber.
The outline of the script is:
- Construct an object manager to watch for
object-addedandobject-removedevents matching the target object (the UMC202HD input). - When the target object is added, for each item in the
audio.positionproperty:- construct the arguments for the loopback module;
- call the module, and;
- store the result in a table to ensure lifetime of loopback node.
- When the target object is removed, delete the table entry.
And here it is:
-- ~/.config/wireplumber/scripts/split-UMC202HD-with-loopbacks.lua
local config = ... or { }

local target_match_str = "alsa_input.usb-BEHRINGER_UMC202HD*"

local channel_name_map = { FL = "Input 1", FR = "Input 2" }

-- tracker for the target object (the UMC202HD input)
nodes_om = ObjectManager {
    Interest {
        type = "node",
        Constraint { "node.name", "matches", target_match_str },
        Constraint { "media.class", "equals", "Audio/Source" },
        Constraint { "device.id", "is-present" }
    }
}

-- storage for the loopback modules
loopbacks = { }

-- when UMC202HD input is added; construct the loopback for each channel
nodes_om:connect("object-added", function (om, node)

    local device_id = node.properties["device.id"]
    local device_nick = "UMC202HD 192k"
    local node_name_stem = "loopback.usb-BEHRINGER_UMC202HD"

    if not (loopbacks[device_id] == nil) then
        Log.info("Replacing multi-channel split for [" .. device_id .. "]")
    else
        Log.info("Adding multi-channel split for [" .. device_id .. "]")
    end

    loopbacks[device_id] = { }

    for channel, mapped_channel_name in pairs(channel_name_map) d

        local args = {
            ["node.description"] = device_nick + " " .. mapped_channel_name,
        }

        local capture_props = Json.Object {
            ["audio.position"] = "[ " .. channel .. " ]",
            ["media.name"] = "Split capture",
            ["node.passive"] = true,
            ["stream.dont-remix"] = true,
            ["target.object"] = node.properties["node.name"]
        }

        local playback_props = Json.Object {
            ["audio.channels"] = 1,
            ["audio.position"] = "[ MONO ]",
            ["media.class"] = "Audio/Source",
            ["media.name"] = "Split playback",
            ["node.name"] = node_name_stem .. "." ..
                mapped_channel_name:gsub("([^%w_%-%.])", "_")
        }

        args["capture.props"] = capture_props
        args["playback.props"] = playback_props

      -- Transform 'args' to a json object here
        local args_json = Json.Object(args)
      -- and get the final JSON as a string from the json object
        local args_string = args_json:get_data()

        local loopback_channel = LocalModule(
            "libpipewire-module-loopback", args_string, { }
        )

      -- store the loopback module (for the channel) until the node is removed
        loopbacks[device_id][mapped_channel_name] = loopback_channel

    end

end)

-- when UMC202HD input is removed; removed the per-channel loopback
nodes_om:connect("object-removed", function (om, node)

    local device_id = node.properties["device.id"]

    if not (loopbacks[device_id] == nil) then
        Log.info("Removing multi-channel split for [" .. device_id .. "]")
        loopbacks[device_id] = nil
    end

end)

-- start the tracker
nodes_om:activate()
The last thing we need to do is configure WirePlumber to load the script:
-- ~/.config/wireplumber/main.lua.d/51-split-devices.lua
load_script("split-UMC202HD-with-loopbacks.lua")
And now the Input 1 and Input 2 virtual loopback nodes only appear when the
device is connected! 🙌
Stay tuned for the next installment, where I’ll cover the filters.
Epilogue
The splitting is now performed magically in the latest versions. See WirePlumber !685. So in the end, this post is now a learning exercise.